Commander
Our ground control software, simply referred to as the Commander, is used to view stream and telemetry data from connected drones and to send them command message (e.g. manual control, return to home, send on autonomous mission). The current implementation runs in python and is based on customtkinter. An implementation using streamlit is a work-in-progress.
Typically the Commander is run by the drone pilot in the field, but in theory it can be run from anywhere with internet connectivity as commands are relayed through the internet backbone over LTE to the drone.
Installation
The commander can be installed by installing the requirements:
cd ~/steeleagle/cnc/python-client/
python3 -m pip install requirements.txt
Launching
cd ~/steeleagle/cnc/python-client/
python3 gui_commander.py
The configuration for the commander is stored in a .env file in the python-client directory. template.env can be copied to .env and modified to reflect the correct endpoints/keys.
cd ~/steeleagle/cnc/python-client/
cp template.env .env
#edit .env file to supply necessary values as shown below
Below is the contents of template.env. Typically all the services are running on the same host, and so all of the server addresses below will actually be the same machine, but the servcies can in fact be run on different hosts in practice.
CLOUDLET="<server address>"
SCP_USER="root"

REDIS="<server address>"
REDIS_USER="steeleagle"
REDIS_PORT=6379
REDIS_AUTH="<from redis.conf>"

ZMQ="<server address>"
ZMQ_PORT=6001
Ensure that the ssh key of the user running the commander is placed into the server’s authorized_keys file. If the key is not present, the scp of any flightscript will prompt for authentication in the terminal. ssh-copy-id user@host can be used to push the ssh key from the location where the commander is being run.
Layout/Usage

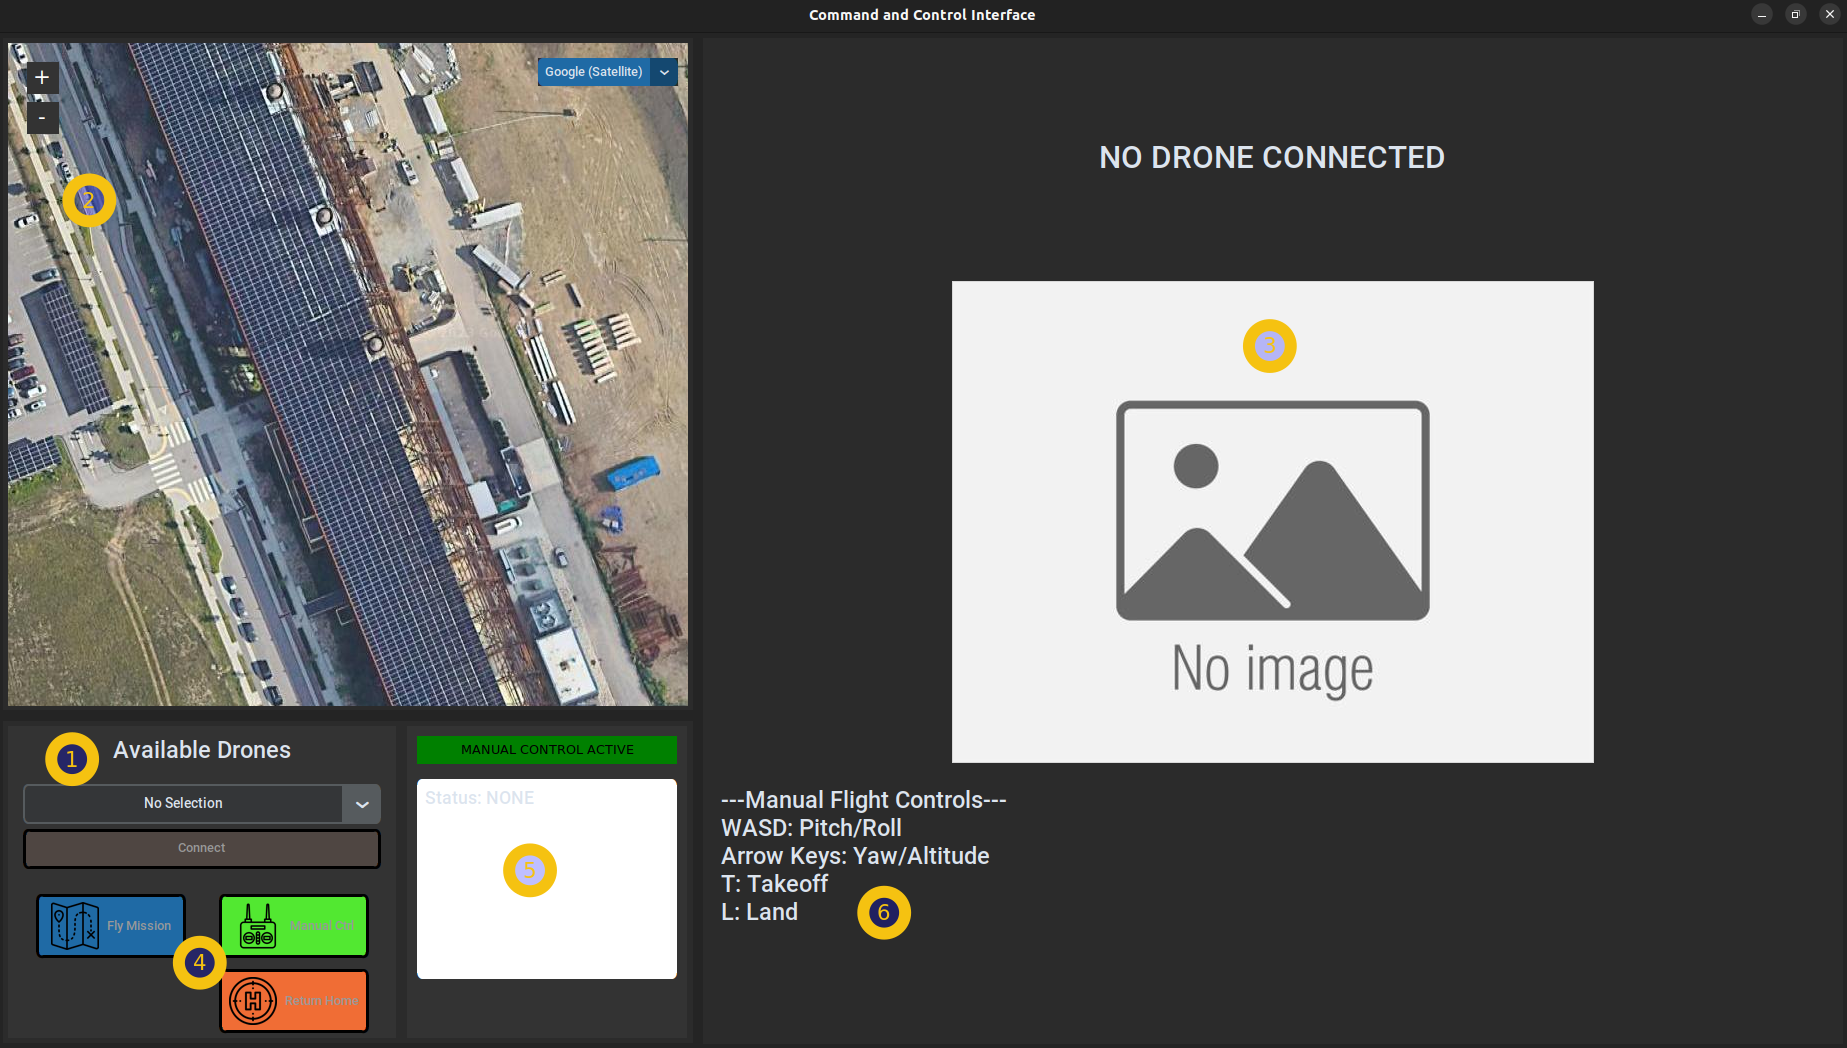
The above screenshot details the layout of the Commander. The typical usage of the application is as follows:
- The ‘Available Drones’ list will be populated with any steeleagle drones once they have connected to the backend either by launching the Android app (Java) or starting the supervisor script (Python). Select a drone from the list and then click the ‘Connect’ button.
- After connecting to a particular drone, the map should be updated to center on the location of the drone and a icon representing the drone will be shown. The position/orientation of the icon will correspond to the current position/bearing of the drone. This will be automatically updated over time. You can change the tile server using the dropdown menu in the upper right corner of the map.
- Once the drone has connected to the backend, it should also start sending its video stream which will be displayed here.
- The buttons here can be used to send control messages to the drone. By default, the drone is initially in manual control mode (see #6). The drone can be instructed to start an autonomous mission by using the ‘Fly Mission’ button. When an autonomous mission is ongoing, the ‘Return Home’ and ‘Manual Ctrl’ buttons can be used to wrest control of the drone at any time.
- This pane will display the current status of the drone. The green box that says ‘Manual Control Active’ will be displayed when the pilot has manual control. It will change to ‘Autonomous Control Active’ when instructed to fly a mission script. It will also indicate that a Return to Home is in progress if the RTH button is pressed. The text box below will contain the current telemetry data from the drone including lat/lon, altitude, bearing, magnetometer status, and Wifi RSSI.
- The manual controls displayed here can be entered on the keyboard to manually pilot the drone while manual control is active.
When multiple drones are connected, you can switch drones by selecting a different drone from the ‘Available Drones’ list and hitting the connect button.